HB1VAX (OpenVMS BBS)
Application Services
HB1VAX is based on a Alpha server DS10 with OpenVMS. I have been a VMS specialist for many years (1992-2017). In 1989 we got our first MicroVAX 3600 and in 1992 we got three MicroVax 3100 systems. Main function of the systems was supporting the logistics (WMS) and operational [MES] executie processes. After supporting the VAX systems for many years we replaced the systems for a AlphaServer cluster environment that was build on two AlphaServers DS20 in 2000. In 2017 we ported the last of the applications running on the VMS cluster to a new MES and WMS system. Finaly i put the cluster down after running for 17 years 24/7 on march the 24, 2017. The end of a era.... I never lost intressed in the good old Digital systems. Nowadays i still have a AlphaServer DS10 running (HB1VAX). Besides the operationl system i have a collection of old Digitall machines and hardware like a VAX3600, VAX3100, VAX-I, VAX-II, PDP-11, VXT2000, VXT420, VXT520 and the AphaServer DS10.

What is OpenVMS?
OpenVMS is a multi-user, multiprocessing virtual memory-based operating system (OS) designed for use in time-sharing, batch processing, and transaction processing. It was first released by Digital Equipment Corporation in 1977 as VAX/VMS for its series of VAX minicomputers. OpenVMS also runs on DEC Alpha systems and the HP Itanium-based families of computers. OpenVMS is a proprietary operating system, but source code listings are available for purchase. The name VMS is derived from virtual memory system, for one of its principal architectural features. When process priorities are suitably adjusted, it may approach real-time operating system characteristics. The system offers high availability through clustering and the ability to distribute the system over multiple physical machines. This allows the system to be tolerant against disasters that may disable individual data-processing facilities. OpenVMS contains a graphical user interface (GUI), a feature that was not available in earlier original VAX/VMS releases. Prior to the introduction of DEC VAXstation systems in the 1980s, the operating system was used and managed from text-based terminals, such as the VT100, which provide serial data communications and screen-oriented display features. Versions of VMS running on DEC Alpha workstations in the 1990s supported OpenGL[8] and Accelerated Graphics Port (AGP) graphics adapters. Enterprise-class environments typically select and use OpenVMS for various purposes including mail servers, network services, manufacturing or transportation control and monitoring, critical applications and databases, and particularly environments where system uptime and data access is critical. System up-times of more than 10 years have been reported, and features such as rolling upgrades and clustering allow clustered applications and data to remain continuously accessible while operating system software and hardware maintenance and upgrades are performed, or when a whole data center is destroyed. Customers using OpenVMS include banks and financial services, hospitals and healthcare, network information services, and large-scale industrial manufacturers of various products.
VAX/VMS on a Raspberry PI
I have recently search the internet to find a way to install VAX/VMS on a Raspberry Pi. I found some intresting websides on how to do this, so i gave it a try. The instructions i made are necessarily quick and make assumptions that you know what you’re doing. The website from Peter Hicks is a good way to start and make your Raspberry ready to go. For detailed information on how to install VMS see the website of Phillip Wherry.
Installation Steps:
- Installation SIMH Simulator
- Creating the Vax machine
- Creating Directory
- Creating microvax3900.ini
- Setting up Networking
- OpenVMS VMS/VAX iso file
- Booting the Emulator
- Restore VMS "save set"
- Install the OpenVMS system
- VAX/VMS installation procedure
- VMS Licence Management Utilty
- VAX/VMS First Startup
- Configure OpenVMS
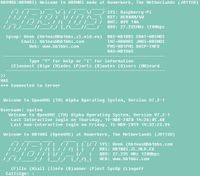
HB1VAX OpenVMS Alpha server DS10 is running various services and a home made BBS. HB1VAX can be connected through the HB9NOS node (just type VAX at the prompt) The BBS "software" is made in DCL (Digitall Command language) and will give you acces to a personal mailbox and download area. I'm just playing arround with the code to make something usefull. I am still working and searching to get AX25 working on a OpenVMS platform, if anyone can help i will appreciate it!
Origin and History
In April 1975, Digital Equipment Corporation embarked on a hardware project, code named Star, to design a 32-bit virtual address extension to its PDP-11 computer line. A companion software project, code named Starlet, was started in June 1975 to develop a totally new operating system, based on RSX-11M, for the Star family of processors. These two projects were tightly integrated from the beginning. Gordon Bell was the VP lead on the VAX hardware and its architecture. Roger Gourd was the project lead for the Starlet program, with software engineers Dave Cutler (who would later lead development of Microsoft's Windows NT), Dick Hustvedt, and Peter Lipman acting as the technical project leaders, each having responsibility for a different area of the operating system. The Star and Starlet projects culminated in the VAX 11/780 computer and the VAX-11/VMS operating system. The Starlet name survived in VMS as a name of several of the main system libraries, including STARLET.OLB and STARLET.MLB. Over the years the name of the product has changed. In 1980 it was renamed, with version 2.0 release, to VAX/VMS (at the same time as the VAX-11 computer was renamed to simply VAX). With the introduction of the MicroVAX range such as the MicroVAX I, MicroVAX II and MicroVAX 2000 in the mid-to-late 1980s, DIGITAL released MicroVMS versions specifically targeted for these platforms which had much more limited memory and disk capacity; e.g. the smallest MicroVAX 2000 had a 40MB RD32 hard disk and a maximum of 6MB of RAM, and its CPU had to emulate some of the VAX floating point instructions in software. MicroVMS kits were released for VAX/VMS 4.4 to 4.7 on TK50 tapes and RX50 floppy disks, but discontinued with VAX/VMS 5.0. In 1991, VMS was renamed to OpenVMS as an indication for its support of "open systems" industry standards such as POSIX and Unix compatibility, and to drop the hardware connection as the port to DIGITAL's 64-bit Alpha RISC processor was in process. The OpenVMS name first appeared after the version 5.4-2 release.
Installation SIMH Simulator
When your Raspberry is up and running you need a a simulator called SIMH, maintained by Bob Supnik (who had a pivotal role in the original development of a number of Digital's machines, serving at one time as technical director for the Alpha and VAX groups at DEC). SIMH emulates a wide range of old hardware. The VAX architecture is one of the many represented.
>> sudo apt install make libsdl2-dev libpng-dev libpcap-dev libvdeplug-dev bridge-utils
>> sudo git clone https://github.com/simh/simh.git
Creating the VAX machine
To create your virtual VAX machine make a choice which VAX architecture you want to use, there are serval machines you can choose from: microvax1, microvax2, microvax3900, rtvax1000, vax, vax730, vax750, vax780, vax8200, vax8600
>> cd simh
Build your Vax machine:
>> sudo make -j4 vax8600
>> sudo make -j4 microvax3900
After building the exe files are in directory:
simh/BIN
Creating Directory
After you have build the executables for your Vax machine create a directory where you will run your emulator from and copy your build executables in this directory. I have created a directory Vax in the pi home directory. make sure the files are exectutable
>> sudo chmod a+x vax8600
>> sudo chmod a+x microvax3900
Creating micorvax3900.ini
Create the file microvax3900 with the following content.
I’ve annotated each line so you can see what it does:
>> sudo editor microvax3900.ini
; Set the memory size to 512 megabytes
set cpu 512M
; Use a TCP socket for the console
set console telnet=12344
; Set the CPU idle detection method to VMS to improve
; performance when OpenVMS isn't doing anything
set cpu idle=vms
; Set the CPU to a model 8650
; https://en.wikipedia.org/wiki/VAX_8000)
set cpu model=8650
; Configure an 1.5 gigabyte RA92 disk
set rq0 ra92
set rq1 ra92
set rq2 ra92
; Attach a disk image to interface RQ0 - SimH will create on boot
attach RQ0 rq0-ra92.dsk
attach RQ1 rq1-ra92.dsk
attach RQ2 rq2-ra92.dsk
; Configure a CD-ROM drive (RRD40) on disk interface RQ3
set rq3 cdrom
; Attach the installation disk ISO image to interface RQ3
attach RQ3 -r OpenVMS552.iso
; Disable the RP Massbus controller
set rp disable
; Disable the RL11 cartridge disk controller
set rl disable
; Disable the RK611 cartridge disk controller
set hk disable
; Disable the RX211 floppy disk controller
set ry disable
; Disable the ??
set ru disable
; Disable the TS11 magnetic tape controller
set ts disable
; Disable the TUK50 magnetic tape controller
set tq disable
; Disable the DZ11 8-line terminal multiplexer
set dz disable
; Disable the LP11 line printer
set lpt disable
; Enable the Ethernet controller
set xu enable
; Set the MAC address to use for the Ethernet controller
set xu mac=08-00-2b-00-00-0a
; Attach the Ethernet controller to a TAP interface 'vaxa'
attach xu tap:tapvax
Setting up Networking
We’re ready to boot our emulator, but we need to set up networking first. It’s not much fun to have a standalone VAX, so we’re going to create a TAP interface and a bridge to allow our VAX to access our network. A TAP interface virtual interface which runs at the Data Link layer (MAC) and allows us to connect the VAX’s Ethernet interface to an interface on our host operating system. Setting the TAP interface is as easy as running this cmdo:
>> sudo ip tuntap add mode tap user pi tapvax
>> sudo ip link set dev tapvax up
If you’re not running under user ‘pi’, change it to your user name.
To access the network, we need to set up a bridge which is like a switch and connects many interfaces together. We’re going to create a bridge called ‘br0’, and add the ‘tapvax’ interface to it, and add the Pi’s ‘eth0’ interface. My preferred way of doing this is to configure Netplan to do it for us. It’s quite straight forward create /etc/netplan/01-network.yaml with the following:
network:
version: 2
renderer: networkd
ethernets:
eth0:
dhcp4: no
bridges:
br0:
dhcp4: yes
interfaces:
- eth0
After rebooting your Pi, you’ll have an interface named ‘br0’ with a DHCP-assigned IP address, and another interface named ‘eth0’ with no IP address. >> ifconfig Here’s the first issue each time you reboot, you’ll have to run the TAP interface setup above.
OpenVMS - VMS/VAX ISO file
OpenVMS still being sold and supported. It’s a secure, rock-solid environment. But that means you need a license to run it. There’s good news and bad news here. The good news is that HP operates a ‘Hobbyist Program‘ for people who want to muck about with OpenVMS in a strictly non-commercial manner. The bad news is that the way this programme operates seems to keep changing. You also need to get your hands on a CD image to install the OS. Your best start is the OpenVMS Hobbyist Portal.
You can also try the following sites to download the ISO files:
internet archive, VAXstation stuff, VaxHaven and WinWorld
Booting the Emulator
Now comes the exciting part, run >> sudo ./microvax3900 which will start and take a moment to create your RQ disks.
At the sim> prompt, enter ‘boot cpu’.
sim> boot cpu <ENTER>
Loading boot code from internal ka655x.bin
KA655X-B V5.3, VMB 2.7
4) English (United Kingdom)
(1..15): 4
Performing normal system tests.
40..39..38..37..36..35..34..33..32..31..30..29..28..27..26..25..24..23..22..21..20..19..18..17..16..15..14..13..12..11..10..09..08..07..06..05..04..03..
Tests completed.
>>>boot dua3: <ENTER>
This will boot a minimal VMS image from your virtual CD iso file and install the base system. It will ask for the date and time, so enter it, then it’ll search for and configure devices on the system.
(BOOT/R5:0 DUA3
2..
-DUA3
1..0..
VAX/VMS Version V5.5-2 Major version id = 1 Minor version id = 0
PLEASE ENTER DATE AND TIME (DD-MMM-YYYY HH:MM)
14-MAR-2021 21:51 <ENTER>
Configuring devices . . .
Now configuring HSC, RF, and MSCP-served devices . . .
Configuring devices . . .
Now configuring HSC, RF, and MSCP-served devices . . .
Please check the names of the devices which have been configured, to make sure that ALL remote devices which you intend to use have been configured. If any device does not show up, please take action now to make it available.
Available device DUA0: device type RA92
Available device DUA1: device type RA92
Available device DUA2: device type RA92
Available device DUA3: device type RRD40
Enter "YES" when all needed devices are available: YES <ENTER>
%BACKUP-I-IDENT, Stand-alone BACKUP V5.5-2; the date is 14-MAR-2021 21:54:23.34
$
At this point the minimal VMS system is up and running showing the VMS prompt $. The next step is to restore your VMS save_set from your CD-rom
Restore VMS "save set"
At the point, you're running the small "standalone" operating system you can used it for backing up and restoring data. Use the command that follows to restore the VMS "save set" from CD-ROM to the first hard disk.
$ backup dua3:VMS2055.b/save_set dua0: <ENTER>
%BACKUP-I-PROCDONE, operation completed.
Processing finished at 14-MAR-2021 22:15:21.07
If you do not want to perform another standalone BACKUP operation, use the console to halt the system.
If you do want to perform another standalone BACKUP operation,
ensure the standalone application volume is online and ready.
Enter "YES" to continue:
At this point, VMS has been copied to your virtual hard disk. Since you have no more save sets to restore at this time, stop the simulation by pressing control-E. Then reboot the virtual machine to continue the installation process.
CTRL-E
Simulation stopped, PC: 9E96B2E5 (BBS R1,@#80004EC0,9E96B2DF)
For the next step to install VAX-VMS on your device it is adviceable to reboot your Raspberry-PI
Install the VMS Operating System
At this point, we'll be booting from the DUA0 device in the future, so we'll set up the default boot device. If this isn't done, the system attempts to boot from device XQA0, which isn't the behavior we're after.
Performing normal system tests.
40..39..38..37..36..35..34..33..32..31..30..29..28..27..26..25..
24..23..22..21..20..19..18..17..16..15..14..13..12..11..10..09..
08..07..06..05..04..03..
Tests completed.
>>>set boot dua0
>>>boot
(BOOT/R5:0 DUA0
2..
-DUA0
1..0..
VAX/VMS Version BI55-2 Major version id = 1 Minor version id = 0
PLEASE ENTER DATE AND TIME (DD-MMM-YYYY HH:MM)
After entering the date en time the installation procedure of the VMS operating system is started.
VAX/VMS installation procedure
VMS License Management Utility
VAX/VMS V5.5-2 Installation Procedure
Model: VAXserver 3900 Series
System device: RA92 - _DUA0:
Free Blocks: 2890227
CPU type: 10-01
* Please enter the date and time (DD-MMM-YYYY HH:MM)
14-MAR-2021 22:41 <ENTER>
%STDRV-I-STARTUP, VMS startup begun at 12-MAR-2021
If this system disk is to be used in a cluster with multiple system disks, then each system disk must have a unique volume label. Any nodes having system disks with duplicate volume labels will fail to boot into the cluster.
You may indicate a volume label of 1 to 12 characters in length. If you wish to use the default name of VAXVMSV2055 just press RETURN in response to the next question.
* Enter volume label for system disk [VAXVMSV2055]: <ENTER>
* Enter name of drive holding the VMS distr media: DUA3 <ENTER>
* Is the VMS media ready to be mounted? [N] Y <ENTER>
* Do you want to install the VMS library files? (Y/N) Y <ENTER>
* Do you want to install the VMS optional files? (Y/N) Y <ENTER>
* Do you want to provide DECwindows support? (Y/N) N <ENTER>
The following options will be provided:
VMS library
VMS optional
Space remaining: 2841526 blocks
* Is this correct? (Y/N) Y <ENTER>
* Will this node be a cluster member? (Y/N) Y <ENTER>
* What is the node's DECnet node name? HB2VAX <ENTER>
* What is the node's DECnet node address? 1.1 <ENTER>
* Will the Ethernet be used for cluster comm (Y/N)? Y <ENTER>
* Enter this cluster's group number: 1 <ENTER>
* Enter this cluster's password: manager <ENTER>
* Re-enter this cluster's password for verify: manager <ENTER>
* Will HB2VAX be a disk server (Y/N)? Y <ENTER>
* Will HB2VAX serve RFxx disks [N]? N <ENTER>
* Enter a value for HB2VAX's ALLOCLASS parameter: 1 <ENTER>
* Does this cluster contain a quorum disk [N]? N <ENTER>
* Enter password for SYSTEM: sys$manager <ENTER>
* Re-enter for verification: sys$manager <ENTER>
%UAF-I-MDFYMSG, user record(s) updated
%VMS-I-PWD_OKAY, account password for SYSTEM verified
* Enter password for SYSTEST: sys$manager <ENTER>
* Re-enter for verification: sys$manager <ENTER>
%UAF-I-MDFYMSG, user record(s) updated
%VMS-I-PWD_OKAY, account password for SYSTEST verified
* Enter password for FIELD: sys$manager <ENTER>
* Re-enter for verification: sys$manager <ENTER>
%UAF-I-MDFYMSG, user record(s) updated
%VMS-I-PWD_OKAY, account password for FIELD verified
* Do you want register any Product Auth Keys? (Y/N): Y <ENTER>
1. REGISTER a Product Authorization Key
2. AMEND an existing Product Authorization Key
3. CANCEL an existing Product Authorization Key
4. LIST the Product Authorization Keys
5. MODIFY an existing Product Authorization Key
6. DISABLE an existing Product Authorization Key
7. DELETE an existing Product Authorization Key
8. COPY an existing Product Authorization Key
9. MOVE an existing Product Authorization Key
10. ENABLE an existing Product Authorization Key
11. SHOW the licenses loaded on this node
12. SHOW the unit requirements for this node
99. EXIT this procedure
Type '?' at any prompt for a description of the information
requested. Press Ctrl/Z at any prompt to return to this menu.
* Enter one of the above choices [1]: 1 <ENTER>
* Do you have your Product Authorization Key? [YES]: Y <ENTER>
Use the REGISTER option to add a new license to a license
database. A Product Authorization Key (PAK) provides the product
name and information you need to register the license. You must
enter all the information provided by your PAK exactly as it appears. Type '?' at any prompt for a description of the information requested. Press Ctrl/Z to return to the main menu.
Issuer [DEC]: DECUS <ENTER>
Authorization Number [ ]: DECUS-USA-nnnnnn-nnnnnn <ENTER>
Product Name [ ]: VAX-VMS <ENTER>
Producer [DEC]: DEC <ENTER>
Number of Units [1]: 0 <ENTER>
Version [ ]: <ENTER>
Product Release Date [ ]: <date from email license info> <ENTER>
Key Termination Date [ ]: <date from email license info> <ENTER>
Availability Table Code [ ]: <ENTER>
Activity Table Code [ ]: A <ENTER>
Key Options [ ]: NO_SHARE <ENTER>
Include Node [ ]: <ENTER>
Product Token [ ]: <ENTER>
Hardware-Id [ ]: NONE <ENTER>
Checksum [ ]: n-cccc-cccc-cccc-cccc <ENTER>
Here is a list of the license information just entered:
* Is that correct? [YES]: Y <ENTER>
* Do you want to LOAD license on this system? [YES]: Y <ENTER>
%LICENSE-I-LOADED, DEC VAX-VMS was successfully loaded
* Enter one of the above choices [1] 99 <ENTER>
Then exit the license management tool by using option 99 on the menu. You'll be prompted for information about your time zone next; enter the data requested. Following that, the system will do some autoconfiguration and will then shut down.
The messages tell you that the system will automatically reboot, but this isn't the case. For the next step to startup VAX-VMS on your device it is adviceable to reboot your Raspberry-PI
VAX/VMS First Startup
Configure VAX/VMS
sim> boot cpu
Loading boot code from internal ka655x.bin
KA655X-B V5.3, VMB 2.7
4) English (United Kingdom)
(1..15): 4
Performing normal system tests.
40..39..38..37..36..35..34..33..32..31..30..29..28..27..26..25..
24..23..22..21..20..19..18..17..16..15..14..13..12..11..10..09..
08..07..06..05..04..03..
Tests completed.
>>>boot dua0
(BOOT/R5:0 DUA0
2..
-DUA0
1..0..
%SYSBOOT-W-WS default and quota raised to PHD+MINWSCNT
VAX/VMS Version V5.5-2 Major version id = 1 Minor version id = 0
************************************************************
VAX/VMS V5.5-2
You have SUCCESSFULLY installed the VMS operating system.
************************************************************
%STDRV-I-STARTUP, VMS startup begun at 14-MAR-2021
%MSCPLOAD-I-CONFIGSCAN, enabled automatic disk serving
%MSCPLOAD-I-CONFIGSCAN, enabled automatic disk serving
Operator _HB2VAX$OPA0: has been enabled, username SYSTEM
Accounting information:
Buffered I/O count: 1297 Peak working set size: 1171
Direct I/O count: 594 Peak page file size: 5665
Page faults: 2789 Mounted volumes: 0
Charged CPU time: 0 00:00:16.70 Elapsed time: 0 00:00:26.65
<ENTER>
Congratulations! You're ready to log in for the first time.
Welcome to VAX/VMS V5.5-2
Username: system
Password: <password you selected above>
Welcome to VAX/VMS V5.5-2
$
Bask in the glow of the long-lost DCL "$ " prompt for a moment. Some Unix shells may also use the dollar-sign prompt, but it's just really not the same. On with configuration: let's initialize two additional disks. These disks, like the virtual DUA0, are configured as RA92 disks in the microvax3900.ini file that the simulator uses. It's possible, of course, to use other disk types or to use only the system disk if you'd rather.
Add Virtual Disks
$ initialize dua1: DATA1
$ initialize dua2: DATA2
$ mount/system dua1 data1
%MOUNT-I-MOUNTED, DATA1 mounted on _PSWVAX$DUA1:
$ mount/system dua2 data2
%MOUNT-I-MOUNTED, DATA2 mounted on _PSWVAX$DUA2:
$ show device
Since you'll want to do this every time the system boots,
you should put these commands in the sys$manager:systartup_vms.com site-specific startup file.
$ set term/vt100
$ edit/tpu sys$manager:systartup_vms.com
Scroll down within the file until you find a place to insert these MOUNT commands, then edit the file appropriately. Use Control-Z to save and exit.
Digital Timeline [DEC]
VAX/VMS
[v5.5-2]